The AAC Cruiserweight M7 Savage is a chaotic, high-intensity sequence packed with movement checks, pattern recognition, and punishing role mechanics. Luckily, Hector Lectures shared his ways to defeat the Brute Abombinator on his YouTube channel. So, this guide breaks down each mechanic in detail to help your raid understand the positioning, patterns, and strategy needed to clear this phase efficiently. Alternatively, you can skip the hassle and save time by letting our experienced team handle the M7S clear for you—fast, efficient, and stress-free, so you can focus on enjoying the rewards without the grind.
General Positioning
Standard Clock Positions
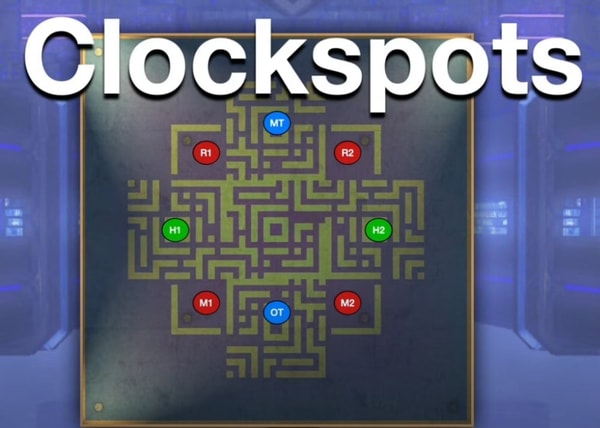
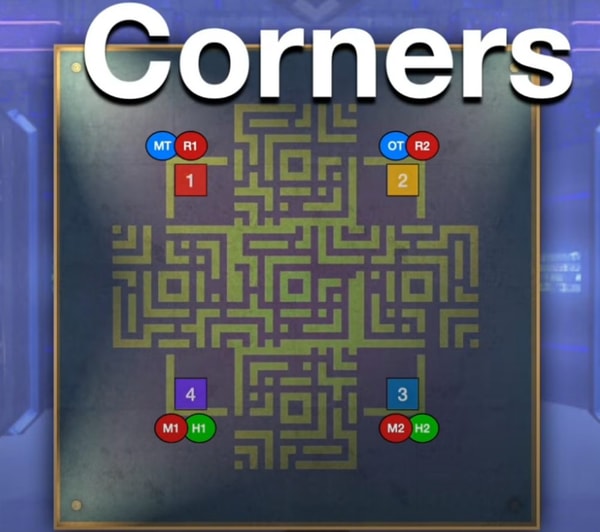
Corner Positions will be needed for certain mechanics.
Party Spread will be necessary multiple times throughout the fight.

Phase 1
Brutal Impact
Raid-wide damage that hits 6 times. Mitigate and heal appropriately.
Stoneringer + Smash Mechanics
The boss casts Stoneringer and spawns either a Club (Out) or a Sword (In), followed immediately by Smash Here or Smash There. The mechanic combinations are:
- Club + Smash Here
- Dodge out.
- Tanks move in with cooldowns for a shared tankbuster.
- Optional: One tank invulns the buster.
- Club + Smash There
- Start out.
- All players enter hitbox, so tanks are furthest for the buster.
- Sword + Smash Here
- Start in.
- Afterward, the party slides out so tanks are nearest.
- Sword + Smash There
- Start in.
- Tanks slide out to be furthest for the buster.
Spore Sac
- Drops 4 AoEs.
- Vines spawn, creating expanding patterns.
- Only two mirrored safe spot patterns exist—memorize them.
Sinister Seeds
Targets 4 players with:
- Pink AoEs → Drop Starburst AoEs.
- Puddles → Drop four total lingering AoEs that explode again after the delay.
This is proximity-based:
- The nearest 4 get one mechanic, and the furthest 4 get the other.
- Which group gets what is random.
Solving Sinister Seeds
1. Toxic Friends / Raidplan Strat
-
- Everyone stacks South for AoE baiting.
- Slide to the safe spot South after initial AoEs.
- Tanks/Melees = nearest, Healers/Ranged = furthest.
- Pink AoE players go to designated corner circles.
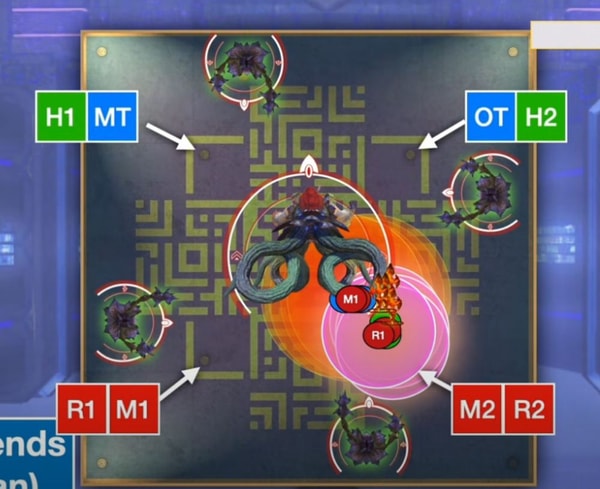
-
- Puddle players run to the corner, split: Group 1 → Left, Group 2 → Right.
- Melees have downtime; tanks can start picking up adds.
- Dodge Starbursts → Take light party stacks (East/West) → Move opposite of your original corner.
2. Kindred Uptime Strat
-
- Preserves uptime but requires dynamic movement.
- Group 1 → West, Group 2 → East.
- Melees = inner safe spots, Ranged = outer safe spots.
Example: Ranged get pink AoEs
-
- Healer → Left, DPS → Right (face boss).
- Drop AoEs at Cardinals.
- Melees loop clockwise, ending in the opposite corner.
- Stack in new light parties (4:4 split).
- Move to corners immediately to avoid lingering AoEs.
Example: Melees get pink AoEs
-
- Drop Starbursts close in, healers/ranged loop around clockwise.
- Tiny safe spots East/West—use eyes, be precise.
Add Phase
4 Adds spawn, each casting:
- Winding Wildwind (Donut AoE) – Most dangerous.
- Crossing Crosswind (Cross AoE).
Strategy:
- Tanks interject Donut AoEs first.
- If tanks can't cover all, Physical Ranged use Head Graze.
- Burn adds quickly or dodge AoEs.
- Failure to kill results in Hurricane Force → Enrage.
Camera + Line-of-Sight Mechanics
Quarry Swamp
- Boss starts skating around, clipping through adds.
- Hide behind adds to LOS Quarry Swamp.
Falling Cameras
- 3 proximity AoEs as cameras drop.
- Take these seriously — standing too close = lethal damage.
- After the first camera drops, rotate in its spawn direction.
- Mitigate/heal any stray damage.
Stoneringer + More Smash
- The boss stops spinning and casts Stoneringer (Club or Sword).
- Resolve with tanks as earlier.
- Next, the boss casts Pulp Smash and targets a healer with a stack marker.
- Immediately followed by Protein Wave: Everyone spreads to clock spots.
Transition to Phase 2
Boss casts Neo Bombarian Special: Knockback to a new arena — position North.
Phase 2
- Boss clings to a wall — becomes untargetable.
- When it auto-attacks (purple flash), it's targetable again.
Stoneringer (Club/Sword):
- Follow-up Glower Power: Line AoE in front + spread AoEs.
- Use designated spread positions.
Revenge of the Vines + Thorny Deathmatch
Revenge is a raid-wide. Deathmatch tethers to the top aggro player with a vine mechanic, which applies a DoT based on distance:
- Tick (close): Light damage, safe for everyone.
- Tick (mid): Moderate damage, still manageable.
- Tick (far): High damage (~100k to non-tanks), dangerous.
- Tick (max range): Lethal — always avoid this.
- Tanks can Provoke to control the tether.
Stoneringer (club or sword) + Abominable Blink
One of the top two tanks gets a flare. The tank without the flare should Provoke to take the tether. The flare tank can either go far with cooldowns or hide in a corner while the party stacks max melee. This hit is heavy, so mitigate accordingly.
Sporesplosion + Brutish Swing
Then comes Sporesplosion (3:1 or 2:1 AoE dodge). Immediately after, the boss uses Brutish Swing — reposition quickly.
Glower Power
Afterward, spread for Glower Power (same spots as earlier but inverted), followed by another Revenge of the Vines raid-wide.
Demolition Deathmatch + Abominable Blink
- Top aggro gets a vine.
- Two proximity tethers appear — the nearest players should pick them up.
- Tethers can be swapped before they turn into vines, but not after.
Then, another Abominable Blink follows — resolve it the same way with the flare tank in the corner.
Strange Seeds
Starburst AoEs (Targeted Players):
- Players are targeted two at a time.
- Each pair always includes one support and one DPS.
- These players drop Starburst AoEs at their location.
- After all eight players are hit, the mechanic ends with a stack marker on either all supports or all DPS.
During the entire sequence, one tank and two other players of your choice are tethered to walls. These players must stay near their assigned walls and cannot freely move like others. There are several common strategies, like locked seeds and fixed seeds. Pick what your group likes.
Strange Seeds (Locked Seeds Strategy)
Tether Assignments:
- The ranged player picks up the wall tether opposite the boss.
- One healer picks up the true north tether.
- These two players are the "tethered" players and will handle alternating positions on the square (odd drops) and circle (even drops) markers. They will rotate square → circle → square → circle for the entire mechanic.
- The healer and ranged both do this in their respective corners.
Everyone Else (Non-Tethered Players):
- Split: Supports left, DPS right (relative to the boss).
- Each group will have assigned drop spots.
- When not dropping, players stay in the "chill zone" (a designated safe zone).
Mechanic Flow:
- First drop – Tethered players move to squares.
- Second drop – Tethered players move to circles; targeted players also move out to drop.
- Third drop – Back to squares.
- Fourth drop – Back to circles.
Afterward, the tethered players go back to the squares, and everyone else can chill in the chill zone. Then, move to partner stack positions.
Partner Stack Setup:
- Untethered ranged and healer pair with the opposite role from the tethered group.
- This results in a lot of movement, especially for the caster, but this positioning naturally leads them to the correct side for the next mechanic.
- Once stacks resolve, everyone is already in place on the outer edges and can dodge either into a circle or the chill zone for safety.
Strange Seeds (EU Fixed Seeds Strategy)
- This strategy is commonly used in EU Party Finder.
- Each player stands directly on their assigned marker and moves very little.
- Drops are static; each player drops their seed and shifts slightly to another player's position to avoid their own AoE.
- Despite how tight it looks, every AoE can be dodged cleanly as long as positioning is precise.
- Use your eyes and awareness—a tiny misalignment can cause clipping.
- If positions are messy (e.g., overlapping AoEs), some players might have to dodge into downtime to survive.
Transition
- During all seed variants, the boss may begin charging a club or sword.
- One wall gets tethered—expect a Brutish Swing (AoE from the wall).
- Followed immediately by Glower Power spreads.
- Heal through this and prep for a hard-hitting raid-wide (Powerslam)—this marks the transition into Phase 3.
Phase 3
- The boss lands in the arena. You'll notice waymarks are present—these cannot be placed unless someone in the party has cleared the fight. Have a cleared player place them.
- Use your second potion and two-minute burst windows immediately on the boss landing to maximize DPS.
- The boss begins with Brutal Impact, which hits 7 times initially. All future casts will hit 8 times—mitigate accordingly.
Stoneringer + Brute Swing + Lariat
- The boss casts Stoneringer 2: Stoneringers, spawning a sword and a club, with one glowing.
- Follow-up cast: Brutish Swing, a knockback from the wall the boss jumps to.
- Players should already be cheating toward the 1/4 side because the next cast is Lariat—a line AoE across the arena.
- The safe side for Lariat is opposite the glowing weapon.
- Mitigate the Brutish Swing hit—this is immediately followed by a hard-hitting untelegraphed raid-wide.
- Another Brutish Swing follows—players begin moving to spread positions.
- Glower Power goes out—spread to avoid overlapping AoEs.
- Followed by Slaminator, a tankbuster: Can be shared, but it's safer for a tank to solo with mitigation.
Debris Deathmatch
This is a major body-check mechanic:
- Four proximity tethers appear—one from each cardinal direction. Assign these to ranged players only.
- If a ranged dies, the tether will retarget to a melee, likely killing them before they can react.
- Boss casts Spore Sac—a series of AoEs that players need to slide out of without pulling their tethers too far.
- Ranged should go to corners to keep tether damage to 2 ticks.
- Tanks should use short cooldowns on ranged to ensure survival.
- Simultaneously, either all supports or all DPS get a stack marker.
- These are dropped in pairs at the cardinals, spaced against the wall.
- Healers and ranged must avoid over-stretching their tethers during this.
Add Phase and Cory Swamp
- Four adds spawn, one at each cardinal.
- Main tank grabs north + west, off tank grabs south + east.
- Do NOT damage the adds—they'll be petrified and killed automatically.
- The boss casts Quarry Swamp.
- Tanks must line-of-sight the boss, rotating the adds clockwise.
- Ranged and healers must be ready for their safe zone to shift slightly.
Sinister Seeds
Ranged players go to the left side of their wall, and tanks/melees stack northwest.
One of two patterns:
Pattern A: Ranged get puddles, tanks/melees get starbursts.
- Tanks and Melees go to corners and drop the AoEs on waymarks.
- Healers and Ranged slide along their wall from left to right.
- After four puddles, Starburst AoEs go off, and the vines are gone. Ranged can move freely.
- A Pulp Smash follows.
Pattern B: Tanks/melees get puddles, and ranged get starbursts.
- Healers and ranged go mid-cardinal, and tanks/melees loop clockwise.
- Ranged must hustle to the four-corner safe zone afterward.
- After AoEs resolve, the boss casts Pulp Smash—stack under the boss.
- Immediately move to clock spots based on the current boss facing.
Stoneringer 2 + Strange Seeds
- Double Stoneringer cast—similar to earlier, but now adds Strange Seeds.
- Either all DPS or supports drop seeds in corner positions.
- Brutish Swing + Starburst combo: Watch the boss's facing—the safe zone is directly in front of the boss.
- Move to Lariat safe side (opposite weapon glow) again.
- Next group drops their seeds—place them cleanly in the corners.
- Another Brutish Swing with the inner safe spot this time.
- Slaminator again—tank should solo with invuln.
- Final sequence: Stoneringer → Smash Here/There combo → Brutal Impact (8-hit).
- If the boss is still alive, Special Bombarian Special cast begins—must defeat the boss before this completes, or it's a wipe.