Black Cat is the first challenge in the AAC Light-heavyweight tier, and it promises to test even the most seasoned adventurers. With its intricate mechanics and relentless attacks, the Black Cat demands precision, coordination, and a keen understanding of its patterns. Fortunately, Hector Lectures shared a guide on his YouTube channel to help us break down each phase of the fight, offering strategies and tips to help us emerge victorious. Let's dive in and tame the Black Cat!
But if you want a quick version, MmoGah boosters can help by providing AAC Light-heavyweight Savage boost. Fast and Reliable!
Quadruple Crossing
The fight will begin with Quadruple Crossing. This is going to target the four nearest players with a cleave. Let the entirety of the DPS take it first. Then, the boss will repeat this cleave, but you need different players to take it so the tank healers can go in to make sure they bait this. The boss will then repeat the exact same two attacks in the same locations, so dodge them.
Double One-two Paw
Biscuit Maker is a two-hit tank buster that leaves a vul, so it's going to either require a tank swap or an invul from one of the tanks. The boss will cast Nine Lives, which gives it a buff, meaning it will store future mechanics. Then, we're going to see One-Two Paw, which plays out exactly the same as it did in normal mode, so dodge these two cleaves one by one. This One-Two Paw will get stored in the boss and used later, so you need to remember which side was safe. Let’s assume it’s left.
The boss will cast Soulshade and spawn two clones. These clones are going to then take the One-Two Paw inside of them. Later on, they're both going to cast that at the same time, so we need to make sure we're to the left of both clones.
After a Nine Lives cast, the first cleave from both clones goes off. Go to the right side of both to dodge this. It's always a diagonal movement straight through the boss. This will be immediately followed by either Double Swipe or Quadruple Swipe. Double Swipe is light party stacks. If, instead, we had gotten Quadruple Swipe, that means you need to be with your partner. This is also going to be saved in the boss and put into its clone via Soulshade, meaning that at the end of the next mechanic, we need to do the same thing we did either in light parties or pairs.
The boss will now do a Leaping Quadruple Crossing. This is the same mechanic from the beginning, but we need to go and do it relative to where the boss will be jumping. While we're dodging the second AoE, we need to make sure that we resolve the mechanic from the clone, so we need to be in pairs.
Bloody Scratch is next, which is a hard-hitting raid-wide. Make sure to mitigate it.
Mouser 1
Mouser is the red tile mechanic you'll remember from normal mode, which is similar to how it was in normal mode. However, there are a very small number of set patterns. There are two dodges you can basically learn. Stand on 4, and look at the 3 mark. If 3 is hit once, you simply go to dodge from 4 to 3. If 3 is hit twice, dodge onto 3 and then onto 2.
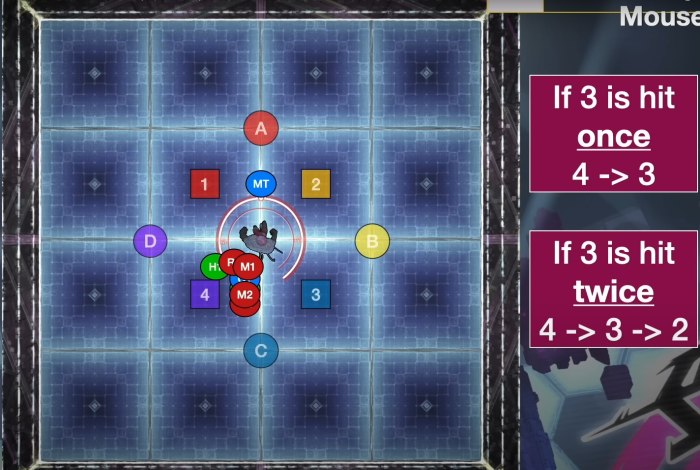
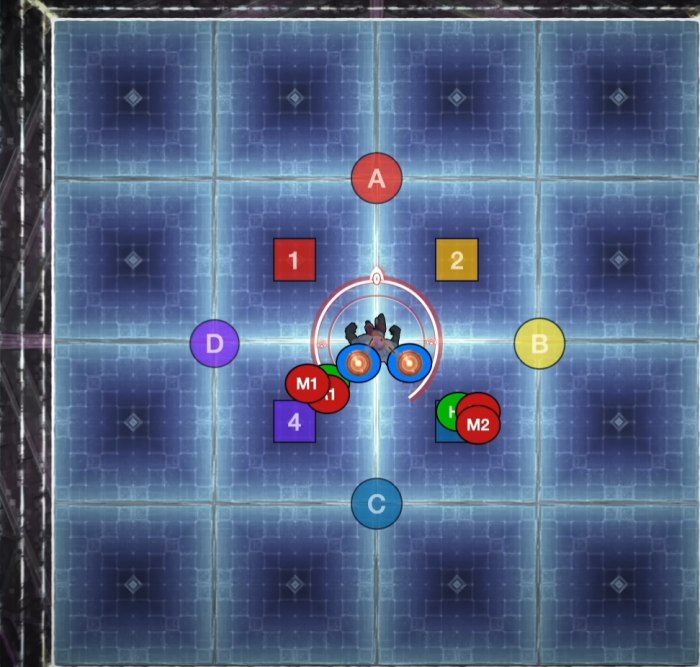
As the tiles start getting destroyed, dodge onto 3 as soon as 3 is destroyed and dodge onto 2 when 2 is destroyed. Then, the boss cast Copycat, and four of the tiles are repaired. Copycat will spawn a clone, and we will get punches with the knockback that we saw in normal mode, but with some twists. First, just like in normal mode, this is either going to target all tank healers or all DPS ones at a time. Then, the boss is going to do one of two animations. One of it is that the boss kneels down and prepares for an uppercut. This will play out just like the normal mode, knocking you away one tile. However, instead of being knocked back relative to where the clone is, you need to turn and face towards where you want to get knocked back. Additionally, every other player needs to make sure that they are not in line with the player who's about to get punched because every tile horizontal and vertical to them is about to have a big knockback AoE that will kill you.
The clone then teleports and punches away the player, and it cracks the tile as they land. As long as everyone is diagonal from that player, they avoid the knockback. Then, the next player is targeted, and you'll see that there's a different animation this time. The boss seems to be set up for an overhead slam punch. In this case, you need to stand on a fully repaired tile instead of a cracked tile because you will not get knocked away; you're just going to get slammed right where you are. Like before, every other player needs to make sure that they are diagonal from the player getting punched.
There's a Biscuit Maker tank buster and then Shockwave, which cannot be immune. And you'll see the stage has been repaired, but two of the corners are repaired slightly quicker. We're in light parties because we want each light party to get knocked back, one west and one east. We want to make sure we adjust so we're getting knocked back into those corners that are repaired first. So, get knocked all the way to the corner and have your tanks and melees go in towards the boss, tank healers left, and DPS right.
Clones Shenanigans
After this, we get another Nine Lives, and the boss will cast a Leaping One-Two Paw; resolve this in the same way as the normal mode. Both the leap and the One-Two Paw are going to get saved in buffs on the boss and get put into a clone, so you need to remember. Instead of doing left or right safe first, inside safe first or outside safe first is good as things are going to get turned around in a second.
The boss casts Soulshade, and one of the clones is going to spawn in the middle and cast Leaping One-Two Paw. The leap is relative to the way the clone is facing, so you can flip the buff around because that'll show the direction the clone is actually going to move from their perspective. There's another Nine Lives and a Leaping Quadruple Crossing. Do what you did like before. Both the Leap and the Quadruple Crossing are going to get saved as buffs and put into a clone in the middle.
The boss will tether randomly to one of the two clones and prepare for it to do its mechanic. Here, it's going to do the One-Two Paw, but it will jump one tile over. We position ourselves on the inside because we remember that the inside safe first. The light party should get split, with light party one being in the North, and two being in the South. That's because, during this, there will always be Tempestuous Tear, which is two line stacks. Take the line stacks while you dodge, and then move across to the other half. Now, you can immediately position the boss right where the second clone is going to jump.
Get into your spread positions, and here comes the Nailchipper. Either all DPS or all supports will get targeted with a marker. These players cannot take the first cleave, so the other roles have to. This means that we're now doing it backward from how we've done it the other times, with tankers and healers first. They'll get the same marker later, but this won't go off for a while. Then, rotate to dodge the AoEs and make sure you're with your partners at the end. Preferably, the players who will get hit with the Nailchipper AoE should be out, but as long as you are not overlapping those AoEs and they only hit a non-marked player, it's not a problem.
Mouser 2
We’ll get another Bloody Scratch raid-wide and the second Mouser. Apply to the rules we’ve mentioned before. Stand on 4, and look at the 3. Then, things start to play out similarly - Copycat spawns a clone, and we’ll start having the punches; since 10 healers were targeted the first time, DPS is now going to get targeted the second time.
A DPS gets targeted with a punch, and they're going to go into position, and everybody's going to be diagonal from them. Now you’ll get one of two mechanics, either Overshadow, which is a line stack marker that you need to take as a group, or Splintering Nails, which is instead a conal AoE that targets one tank, one healer, one DPS. So, you split into role stacks, tanks left, DPS right, and healers in the middle. Make sure that you're always diagonal from the player getting punched. This will repeat for the other two players that still need to get punched, and it's random whether or not you get an Overshadow or a Splintering Nail, but you will get two of each. When all is done, you’ll get a Biscuit Maker tank buster and another Shockwave knockback, which is exactly the same as before, with the spread AoEs.
Raining Cats
When all is done, you’ll get two more mechanics to deal with. Raining Cats is first up. In preparation for this, Hector recommended positioning like this.
Light party one is near the hitbox or in it; light party two is slightly out of the hitbox. And you have the two tanks who grab tethers in front of their parties. Here, you need to have the nearest player and the farthest player be players that don't have a tether because the nearest player and the farthest player get targeted with some shared damage AoE, and if a player with a tether takes it, they will die. So, to do this, we have one player in light party one and make sure they are in the hitbox, one player in light party 2, and make sure they are well out of the hitbox. The two players taking tethers need to stand on the hitbox. After the cones and the stacks go off, we need to swap. So, have a role take the tether, and get into the same positions we were just in. Repeat this until everybody has taken the tether once.
Predaceous Pounce
The boss will cast Copycat, and we get our final mechanic. A clone spawns in the North, and we're going to get the same mechanic that we saw earlier, with a bunch of AoEs and paw prints going around. With good DPS, there's a decent chance you'll skip this mechanic. You need to make sure that while dodging this, you stay near to the north-south line because the boss will combine it with One-Two Paw. Dodge to the safe side and make sure you're not in any AoEs. The first cleave will go off at the same time as the final bit of the clone and then immediately dodge to the other side. Your gap closer is really helpful here. All that's left is one more Mouser, but you'll notice too many tiles are getting hit, so this is not going to leave any tiles safe. Try to stay alive as long as you possibly can by staying on a melee tile, and try to kill the boss before your final tile breaks.
Related Link: https://www.mmogah.com/news/ffxiv/ffxiv-arcadion-aac-light-heavyweight-m4-savage-guide