Final Fantasy XIV Patch 7.2 comes with a new wave of challenges, especially the AAC Cruiserweight Savage raid. This fight pushes both mechanics and teamwork to their limits, demanding sharp execution, clean coordination, and a deep understanding of each phase. Luckily, Hector Lectures shared a guide on his YouTube channel, guiding us through the whole M6S fight. Whether you're a raid leader preparing your group for progression or a determined raider hungry for clears, this guide breaks down everything you need to conquer the chaos and emerge victorious. But if you want it quicker, hire an expert! You can buy AAC Cruiserweight Savage boost directly from MmoGah. As a professional shop in the market for nearly two decades, we've got you all covered!
Pre-Fight Setup
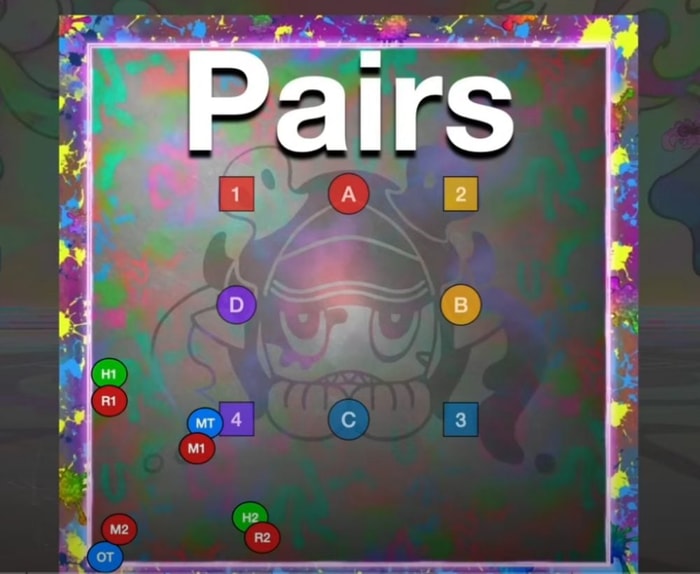
We will need clock spots, light party groups, and pair positions. (Images below are screenshots of Hector Lectures' video).


Phase 1: Color Clash/Double Style
Mousse Mural: Raidwide AoE. Just heal through it.
Color Riot (Tank Buster)
- Boss targets the nearest and farthest players.
- One tank stands under the boss, the other far out.
- The upper gun color hits the closest tank; the lower gun color hits the far tank.
- This leaves a persistent debuff, even through death. Future mechanics depend on this debuff.
Wingmark: Each player receives a 20s debuff. When it expires, you'll be flung in the direction you're facing.
Color Clash: Watch how many times the boss fires into the air:
- 2 shots = Light Parties
- 3-4 shots = Pairs
Double Style: Spawns random mechanics in the arena. The mechanic types are:
- Bombs: Explode in place.
- Wing Bombs: Jump, then explode.
- Succubus: Casts large AoE in place.
- Marble: Cleave sides, leaving flanks safe.
- Far is safe for Bombs and Succubus.
- Near is safe for Winged Bombs and Marbles.
Common Patterns (safe spot):
- 2 Marbles → go between them.
- 2 Succubus → go away from both.
- Marble + Succubus → towards Marble, away from Succubus.
- Bombs + Marble → away from Bombs, towards Marble.
- Wing Bombs + Succubus → towards Wing Bombs, away from Succubus.
Sticky Moosse:
- Targets 2 non-tanks with binds and stack markers.
- If one from each light party is hit, resolve with your light parties.
- If two are from the same party, go to the nearest two players. If unsure who's nearest, rotate clockwise.
Second Color Riot:
Check the gun directions and match them to your tank debuffs. The tank with the opposite debuff to the up-pointing gun goes under the boss.
Phase 2: Desert Phase
Sugarscape - The debuffs include:
- Everyone gets a Sun DoT.
- One DPS gets a stack debuff (43s).
- Four players receive giant defamation markers.
Layer: Layer casts summon cacti with fixed spawn patterns. Learn them for consistent dodging.
After the final cacti, send:
- Tank with defamation → Northwest
- DPS with defamation → Southwest
- Party → Middle
Sticky Moose (again): Go to clock spots and prepare to resolve more stack markers.
Layer + Quicksand:
Avoid the cactus corner, then:
- H1 → clockwise from cactus
- H2 → counterclockwise
- The rest of the party goes opposite that corner.
Bomb Tether Mechanics:
- One role group gets bombs; the other gets wing bombs.
- Bombs walk into quicksand.
- Wing bombs face quicksand and get flung into it.
- Avoid overlap and spread to avoid AoEs.
- Exit quicksand immediately once bombs are placed.
Color Riot Tank buster: check debuffs and repeat prior strategy.
Phase 3: Adds Phase
Add Types and Priorities:
- Mu: Mild auto attacks. Enrage eventually. Low kill priority.
- Yan: Stronger autos. Never let them near Mu—they become deadly. Medium priority.
- Gimme Cat: Steals LB and jumps to bait AoEs. Higher priority than Muse.
- Feather Ray: Tether to first hit (preferably ranged DPS). Drop puddles that deal DoT and can kill tanks if hit.
- Jabberwock: Targets a healer and walks toward them. You can stop this by stunning the jabberwock. The stun order is tank first and melee second. Then, kill fast, or healer dies.
Before the add waves begin, you're going to lose your Limit Break gauge anyway. Consider attempting a Level 2 LB from either your caster or physical ranged DPS to hit the initial adds. The timing is tight, but it's a nice burst of damage if you can land it properly. Try it and see what works for your group.
Wave 1: Two Mu, One Yan, One Cat
- Main Tank (MT) starts in the East and picks up the Mu.
- Off Tank (OT) starts in the West and grabs the other Mu.
- Tanks immediately pull their adds apart: MT pulls to the Southeast; OT pulls to the West.
- Melee should focus on the Yan.
- Ranged should focus on the Cat, which will jump around and eventually target a random player.
- Avoid the Cat's telegraphed AoE pounce – it applies damage down and reduces max HP.
- Continue burning down the Yan and Cat throughout this first wave.
Wave 2: Two Mu (South), Two Feather Rays (North Corners)
As the Live Painting cast summons this wave, range players should move to their corners:
- Caster to Northwest.
- Physical Ranged to Northeast.
Tanking:
- OT pulls the Northwest Feather Ray (and drags any leftover Yan).
- MT pulls the Northeast Feather Ray.
Kill Order:
- NW Manta Ray.
- NE Manta Ray.
Tether Baiting:
- Range DPS should tag their respective mantas first to get the tether and bait the puddles.
- With strong DPS and your two-minute burst windows, you may kill the NW manta before it drops a second puddle.
Important Mechanic:
- During the next Live Painting, the North slime turns into a Yan. If Mu adds are nearby, it will enrage immediately.
- MT must move away and pull their Mu south, then west.
- Focus down the manta ray, cleaving Mu if possible.
Wave 3: One Yan, One Cat, One Jabberwock (initially untargetable)
- OT goes North to grab the Yan.
- Everyone else waits near the West, targeting the Mu.
Jabberwock Mechanic:
- A random healer is targeted and bound in the corner.
- Jabberwock begins marching toward the healer – you must kill it before it reaches them.
- Stun Order: Tank stun → Melee stun.
- Single-target DPS the Jabberwock hard until it dies and frees the healer.
Boss Casts "Ready ore Not": A raid-wide AoE. Heal and mitigate accordingly.
Muse Enrage – "Rigato":
- If not dealt with quickly, Muse will enrage.
- You can survive one, but it's very dangerous (heavy hit + bleed).
- Ideally, none go off – cleave aggressively throughout.
- Kill any remaining Muse, then deal with the Gimme Gat.
Wave 4: Two Mu, Two Feather Rays, One Cat, One Yan, One Jabberwock
- MT grabs the Muse and pulls them to the Southeast corner.
- OT holds both Yans (lots of autos – be careful), pulling them to the southern corner.
- MT then pulls the zoo (mobs) toward the Jabberwock.
Ranged DPS: Target and hit the manta rays first to get tether and bait puddles.
Healer:
- Another healer is targeted and bound. They must go to their designated corner.
- Jabberwock spawns again. Like before, stun and burn it fast to free the healer.
Kill Priority:
- Jabberwock (single-target burn and stuns).
- East Manta Ray.
- Cat (before it enrages).
- West Manta Ray.
- Muse (should be low from cleave).
Additional Notes:
- Do not pull the Muse too close to the Yans, or they will buff and enrage.
- After all other adds are dead, finish off the Muse.
- Another Ready ore Not raidwide will go out – mitigate.
Yans Remaining:
- Pull them to the center.
- MT may provoke one off OT to balance autos.
- "Single Style" will spawn AoE arrows – dodge while finishing the Yans.
- At the end of this phase, you should receive a Limit Break 3 as a reward.
Phase 4: Bridge Phase
- Color Riot tank buster may overlap with remaining adds.
- Followed by a Mousse raid-wide (if adds aren't dead fast enough, the boss enrages).
- Boss Jumps North – "Sugarcape" Bridge Phase Begins
- Pull the boss Northwest and prepare for Double Style.
Mechanic Pairings:
Arrows + Thunder Spreads → Spread out on dry ground.
Arrows + Fire Stacks → Stack in the water to mitigate damage.
Positioning:
Group 1 (supports + melees): Center.
Group 2 (supports + ranged): Hide behind south bridges.
Layer Casts:
Water becomes unsafe (lava) – move out!
Stack in NW between bridges and wait.
Lightning Mechanic:
- A flash of lightning = delayed AoE dropped on the current spot. Immediately move away (similar to Twister or Stepped Leader).
- Watch for the storm cloud and stay away from its explosion.
Electrified Ground + Cloud AoEs:
- Two players get marked (1 support, 1 DPS).
- The cloud moves toward a platform.
Marked Players:
- Face the cloud.
- Support always goes clockwise/left.
- DPS always goes counterclockwise/right.
- Drop your AoE far from the bridge – it electrifies the grass on your platform.
- Everyone else must be on the bridge to stay safe.
- This repeats for four total waves, eventually hitting every player.
Final Mechanics: Stack on the final bridge for "Putting Party" – a 5-hit multi-hit stack.
Split to Platforms:
Melees → South.
Ranged Group 1 → Northwest.
Ranged Group 2 → Northeast.
Water and bridges turn to lava (due to Layer).
Mousse Drip Cast:
Range DPS should be furthest from the boss to bait stack AoEs.
Tower Mechanics:
- Four towers spawn in the south, two on each of the other platforms.
- Have healers and ranged cover their towers.
- Have your healers and ranged players group up to take stacks that drop four consecutive puddles.
- Do NOT bait puddles onto tower spots—they persist during tower mechanics.
- Boss casts Moussacre — cleaves on nearest players.
- Melee players spread out to avoid cleaving the ranged/healers.
- After four puddles drop, don't enter your tower immediately.
- Move next to your tower, wait for the crack of lightning, then soak.
Wing Mark & Towers (Jump Phase):
Everyone gets a 10-second Wing debuff, and more towers appear.
Tower Layout Variations:
(A) 4-2-2 Split:
- Towers split 4/2/2 across platforms.
- Start in the south and rotate clockwise.
- All players rotate clockwise and prepare to jump using Wing debuff.
Tips for Jumping:
- Face the widest, fattest section of the opposite platform.
- On Wing debuff expiration, you're launched in the direction you're facing.
- Land, position near (but not in) your tower, wait for lightning, then soak.
(B) All 8 in the South:
- All players go to the south platform.
- Players already in the south head east, and face west to jump back across.
- Again, position near your tower, wait for lightning, then step in the tower.
- Boss casts Moosse Mural (raid-wide). Phase transition begins.
- Main tank should immediately reposition the boss to center — you're getting Sticky Moosse, and you'll need space for clock spreads.
- If the boss is still near the wall, just spread and YOLO, then stack in groups of 4.
- Tankbuster: Color Riot follows.
- Fight loops back to Wing Mark + AoEs seen at the beginning.
Final Phase Tips:
- You don't need melee gap-closes anymore; the boss follows the party.
- After pulling mid or waiting for a jump, the boss casts Artistic Anarchy.
- Burn phase: You have until the telegraphs appear to kill the boss.