Are you ready to conquer one of the most challenging encounters in Final Fantasy XIV? This guide, shared by Rinon on his YouTube channel, helps you navigate the complexities of the AAC Light-Heavyweight M4 Savage raid. Let's dive in and make this raid a memorable victory! Of course, if you want to buy AAC Light-Heavyweight Savage raid boost, as a professional online store, we’ve got you all covered!
Bewitching & Electrifying Witch Hunt
Wicked Thunder opens up with Wrath of Zeus, a raid-wide damage. During the tail end of the opener, the boss will jump to the North and begin to cast Bewitching Flight, which will spawn a number of gun battery cubes on the left side of the arena. At the same time, she will begin charging the wing lasers, as she did in the normal mode. Both the wing lasers and the cubes will shortly shoot line AoEs across the room. Simply find one of the safe spots.
Wing lasers after firing will leave four purple lines on the floor, which you have also seen in the normal mode. Then, they will glow and explode, and you need to avoid them. They go off in pairs of inner lines or outer lines, so you need to be either near the middle or at the sides to avoid them. At the same time, the boss is casting Electrifying Witch Hunt, spawning a brand new set of gun batteries on the right-hand side of the arena. You'll need to dodge the first set of exploding lines on the floor and the gun batteries at the same time. Ensure the group is spread out by organizing light parties into two vertical lines, with ranged and healers on the North and South, as well as melee and tank spots on the boss.
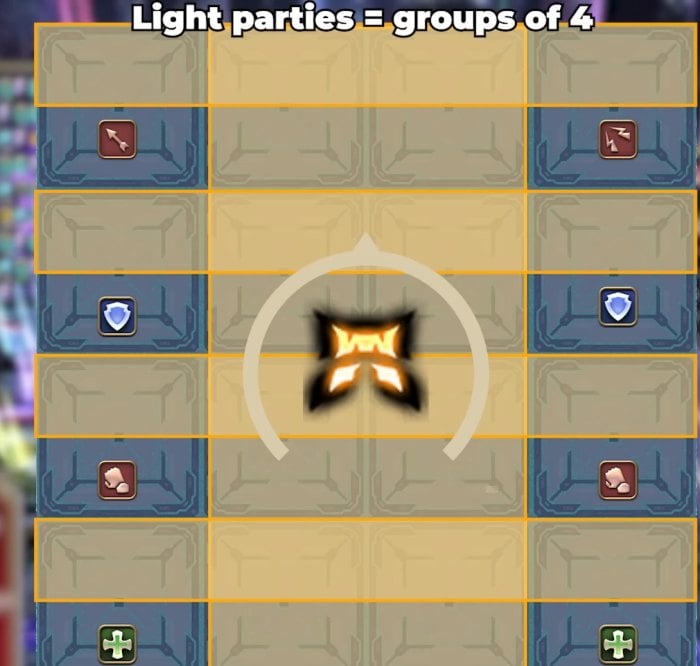
A cast of Witch Hunt will follow all of this, which will sink up with the two leftover floor lines beginning to glow, preparing to explode. As this cast begins, the boss will telegraph one of two markers, resulting in either the furthest four players or the four closest players from the boss being Witch Hunted. If your natural line positions don't fulfill the requirements for this, simply swap with your nearby partner to fix it.
Widening & Narrowing Witch Hunt
The attack that follows will be either Widening Witch Hunt or Narrowing Witch Hunt. The boss will alternate between point point-blank circles and donut AoEs for a total of four attacks. If the cast is Widening, it will begin with a circle AoE, and if it's Narrowing, it will begin with a donut AoE. It will also show the close & far telegraphs for a total of four times throughout the duration of the cast bar, which will also alternate. So, if it shows close first, it will be close-far-close-far. These marks signify the two closest or furthest players will be let up on clones at the same time as the donut or circle AoE resolves.
Your goal is to fulfill the in-out-in-out or out-in-out-in AoE dodges and position players to bait the close-far-close-far clone jumps two by two, with each player taking one bait.
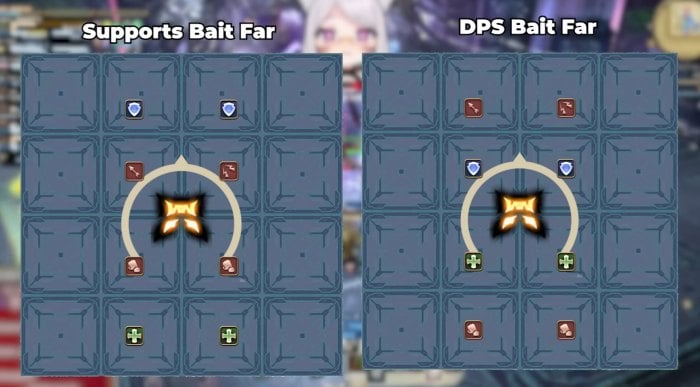
A good way to deal with this is to have the melee and tanks on the cardinal positions, and the healers ranged on the intercardinal positions. The supports will be baiting first, with the tank always taking the first close bait and healers taking the first far bait. Then, DPS will bait the third and fourth hits, with ranged taking the second far bait and melee taking the second close bait. For example, if it's close-far-close-far, it will be tank, healer, melee, and ranged. If it's far-close-far-close, it will be healer, tank, ranged, and melee.
Electrope Edge
Once you're done, another Wrath of Zeus raid-wide and Electrope Edge will come after. Electrope Edge will spawn four Electromines, one in each corner of the room. Then, she will shoot beams across the intercardinal of the room at the Electromines. Firstly, don't get hit by these laser beams. Secondly, watch them closely. If an Electromine is hit by two Witchgleam beams, it will shortly explode, rendering that quadrant of the arena is a death zone.
Wicked Thunder will then cast a Sidewise Spark. This half-room telegraph will be covering one of the two safe quadrants. Players then need to watch Wicked Thunder for her animation. The animation will either show four larger orbs or eight small orbs. Eight small orbs means spread within that quadrant, and four large orbs means stack in pairs within that quadrant.
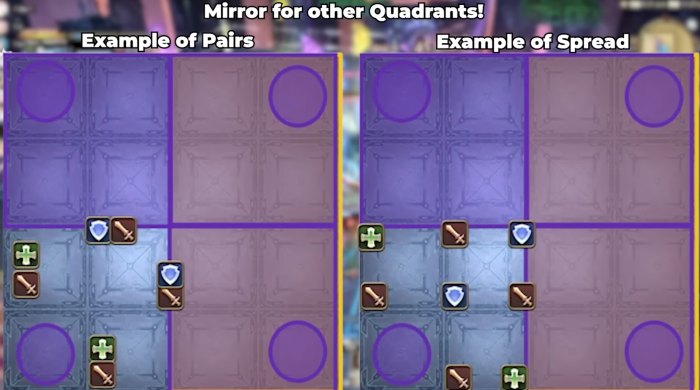
Your pairs will consist of one support and one DPS, so put the ranged and the healers together as well as the melee and tanks. A Wicked Jolt tank buster comes immediately after, shooting a heavily damaging line AoE. This is a two-hit buster that applies a vuln afterward, requiring tank swaps to safely resolve, including the initial tank taking it back after the second hit goes off. You can just involn this.
Lightning Cage
Electrope Edge will follow, and as this cast goes off, prepare for it by spreading into your same pre-assigned positions and markers as you did for the most recent Witch Hunt mechanic. At the end of the cast, everybody will receive an electrical condenser buff with one of the two timers. The short-timer starts at 22 seconds, and the long-timer starts at 42 seconds. Two players in each role will get long timer, and the other two will receive short timer. Then, Witch Gleam will follow, blasting players one by one and dealing damage with every hit. Your goal is to keep track of how many times you get hit by a beam. If you're on a short-timer, you will be hit two or three times. If you're on a long timer, it will be one or two hits.
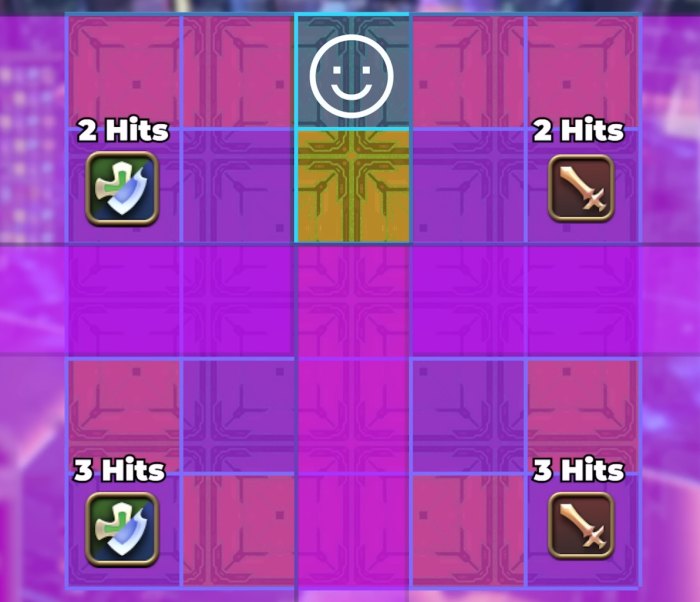
Lightning Cage will come next, spawning this exact pattern of AoE's on the floor. This pattern will always be the same, but its orientation will not be.
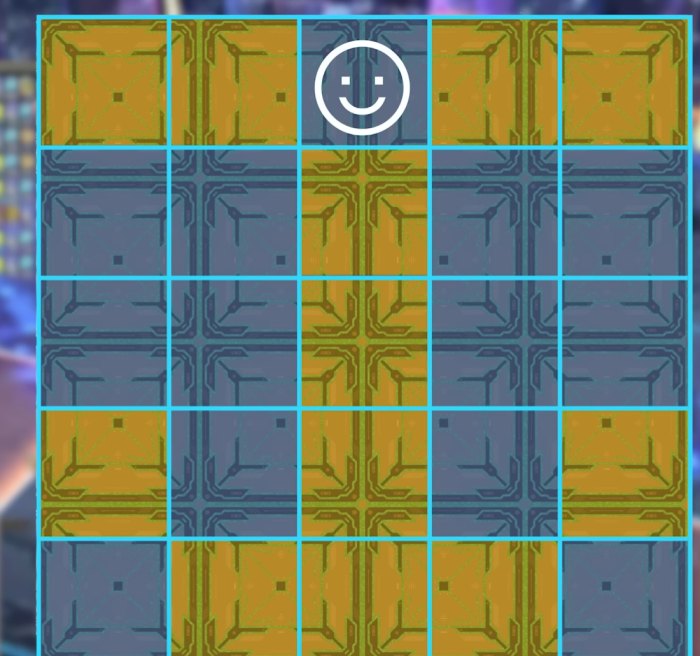
According to Rinon, the spot with the smiley face mark is safe, and you can always go there. This is where all four long debuff players will be headed. When your debuff expires, you will explode for a square AoE, the size of which will scale one by one on the grid based on the number of times you were hit. So if you took three lasers, you'll explode for three squares in each direction around you, and being hit twice will make you do two. Based on the safe spot mentioned above, short support players go left, short DPS go right, and put the three-hit player into the very far corner, and the two-hit here.
A Sidewise Spark will follow, as well as the same spread or pairs that happened a little earlier in the fight. As the Sidewise Spark goes off, you need to zoom over to positions for the second set of debuff resolutions, which is the exact same as the first. Wicked Bolt follows this with a multi-hit stack that you just heal through.
Ion Cluster
Afterward, Wicked Thunder will use Ion Cluster, teleport North, and generate her Cannon mode from normal, functioning the exact same way, but hitting way harder. Find the safe row and head over there as soon as possible. There is an early tell before the first hit goes off - her hitbox will turn a little and go away from where her hitbox turns, and that will be the eventual safe row.
You'll also notice that each player has three stacks of this debuff. The blue is called negatron, and the yellow is called positron, and there will be four of each debuff. You need to cleanse these during the next mechanical Onslaught, or you will die at the end. Electron Stream begins casting once the boss teleports to your newly reduced safe area, with her front charging either a yellow or blue beam and her back charging the other color. Being hit by the opposite color Electron Stream will cleanse one stack of your debuff but also give you one mechanic to resolve as a result. Four players in total will receive either donut buffs or spread buffs. Two players will receive currents, either green or blue, which will shortly have them shoot a pizza-sliced AoE at the closest player of blue or the furthest player of green. The last two players will get a purple debuff, and they must be hit by a pizza-sliced AoE to cleanse the debuff.
Transition
Then, another Wicked Jolt tank buster will follow. Wicked Thunder will eventually teleport to the middle and face south. Split into the same pairs you used at the start of the encounter, with one support and one DPS taking one quadrant each. After the cost of Electrope Transplant, pizza sliced AoE will appear. Every time they go off, dodge into them. Make sure to spread. Each pair should have one melee player, and one ranged player so the ranged member of the pair can disengage and move behind. After five pizza slices, one player in each pair will be hit by Conduction Point, and immediately after, the boss will shoot out Forked Fissures at the raid. To resolve this, the players that were not hit by the Conduction Point circle AoE need to stand in front, and the players that were hit stand behind.
After this all goes off, there will be one more pizza slice. Then, you have a good chance to dip in for heals, and then the entire mechanic repeats again exactly the same as before. After the final pizza slice cleaves, set up heavy mitigation for the raid damages and stomps that follow, and congregate the group south on the edge of the boss's hitbox. You'll be shortly thrown over to a separate arena as Wicked Thunder completes her transformation and the second half of the fight begins.
Exaflares & Wicked Special
In Phase Two, she will open with Cross Tail Switch, which you use tank LB3 to mitigate. Immediately afterward, Exaflare lines will appear all over the floor, and two players will be marked with a multi-hit stack indicator. Split into your light parties, head to the left and right walls immediately, and look at the Exaflares. On each side, there will be one row of Exaflares where every single arrow does not point toward you. You will stand adjacent to that and dodge into it after the first pulse resolves. These multi-hits will then start pulsing. They are so big that it doesn't even really matter which side of the safe Exaflares players begin on when dodging onto it. They'll still be hit as long as they are adjacent to the correct destination row. Wicked Special begins casting next. The boss will either begin to show a fire sword animation or her lightning lasers. The sword will smash the center, with the sides being safe. The lightning lasers will shoot the sides, so the middle is safe.
Mustard Bomb
The next is Mustard Bomb, with two tethers originating from the boss. Tanks grab these and run to the front corners of the arena and pop cooldowns as they are tank busters, with the rest of the group spreading out in a zigzag across the arena behind them. After the tethers go off, they will leave a Mustard Bomb debuff on each tank, which needs to be passed via bodily contact to another player, or they'll die of the fire resist down. Four of the six non-tank players will be hit by spread AoEs at the same time as the busters go off, leaving two fixed players taking the debuffs away from the tanks.
Aetherial Conversion
Aetherial Conversion follows, and to begin this mechanic, Wicked Thunder will charge either fire or water into her arms. The red dots on the arena are points of impact. Whichever arm glows first will resolve first. Simply go away from the fires or go to the water in the order of them glowing. When Tail Thrust finishes casting, these will go off.
Twilight & Midnight Sabbath
Next, you need to deal with Twilight and Sabbath, which are opening with the arena shrinking and four clones slowly spawning on the north, south, east, and west. Two of these clones will be telegraphing the half room, attacks in both normal and phase one, rendering one quadrant of the room safe. Bear in mind that the two telegraphing will always be next to each other, not opposite, so this can make it a bit easier to find the safe spot if you're struggling. Make sure to stack in the middle as these start spawning, as large circular AoEs will drop under each player. Move to the safe quadrant when you know where it is. Then, the other two clones will telegraph, rendering another quadrant safe. A Wicked Special will cast to resolve at the same time, so it's one quadrant plus either side or middle safe at the same time.
The next mechanic is Midnight Sabbath, which will begin spawning eight more clones. Split into pairs, with healers going with ranged and melee going with tanks this time. You will each have two clones to look at in order to resolve your mechanic, one on cardinal and one on intercardinal. The clones will either have cannons or wings. If they have cannons, they will shoot a line AoE through the diagonals of the arena, and if they have wings, they will do a donut AoE.
The last component of this mechanic is the boss cast bar, which will either be Scattered Burst, AKA spread, or Concentrated Burst, AKA stack in pairs. Then, you must resolve the second clone, and whichever stack or spread wasn't used first will then go off second. The Wicked Special immediately follows, as well as a Wicked Thunder raid-wide.
Raining Swords
She will then cast another Aetherial Conversion, showing either fire or water and the charges of each arm in order, but this will be stockpiled for later rather than going off immediately. Split into your light parties and go to the left and right sides of the arena. This will allow you to avoid the Flame Slash going through the middle, which will destroy the center and split the arena. Four towers will spawn on each side, which will resolve with the Raining Swords cast.
Four Swords drop on each side, and the boss will begin linking to them with chain lightning. Whichever sword she doesn't link to chain lightning will be safe, and she will showcase each safe spot twice. There are a total of four safe spots, and each sword will be used once as a safe spot. Your job is to memorize the order of which swords don't go off, so you know the four spots to go in. Make sure to resolve this mechanic on the edge of the arena, as the chain lightning explosions are circle AoEs, making it pretty tight on spacing if you stay in the middle. Once the last chain lightning goes off, the arena will reform, and the stored Aetherial Conversion will go off at the end of the Tail Thrust cast like before. Mustard Bomb follows once more, and you solve it exactly like the last one.
Sunrise Sabbath
The arena space will become smaller and circular. Then, Ion Cluster puts a stack of negatron or positron on each player, with a debuff of either 23 or 38 seconds. Four players will get the short-timer, and four will get the long-timer debuff. Sunrise Sabbath will cast next, which will quickly spawn six more clones, with four cannon clones on the intercardinal and two wing clones on the cardinals. Additionally, two towers will spawn later on opposite cardinals. You can tell where they're going to spawn based on where the winged clones are looking. As a short debuff, your aim is to go close to a cannon clone with a color opposite to you and beam it in the cardinal direction away from a tower. As a long debuff, your aim is to take a tower. Cannons will lock onto the closest player, so ensure you bait both the beam and also don't accidentally overlap lasers.
A Wicked Special in or out, and then the second set of towers and clones will follow, which you'll deal with in exactly the same way. Check the tower spawns and find your cannon. The stockpiled Aetherial Conversion will go off after this on the Tail Thrust past, and Sword Quiver will follow. Split up into your pairs, healers with ranged and melee with tanks, and watch the AoEs spawn on the floor. There will be four safe quadrants. Send your pairs to them, and each will be cleaved. The Sword Quiver does a lot of damage, so stay stacked up for heals for the initial hits and then spread afterward. Sword Quiver will repeat two more times, and then the Wicked Thunder Enrage will be cast, signaling the end of the fight.
Related Link: https://www.mmogah.com/news/ffxiv/ffxiv-arcadion-savage-m1-guide-how-to-beat-the-black-cat